Database Management
Managing your database
Build task managers, contact forms, booking systems, and more. Adding a database to your Anima Playground project lets you store and manage real data from your users.
In this guide:
- Adding a database
- The Data tab
- Understanding tables
- Security policies
- Working with data
- Tips and best practices
- Quick reference
- Skip databases by default
Adding a database
Databases and tables are created on-demand through chat. No forms to fill out, no configuration screens — just describe what you need.
How it works
Two ways to add a database:
-
AI detects it — Describe a feature that needs data (like "add a contact form that saves submissions"), and the AI recognizes this and sets up the database automatically.
-
Ask for it — Tell the AI what you want to store: "I need a table for blog posts" or "add a database to save user signups." The AI creates everything for you.
This works the same whether you're writing your first prompt or iterating in the playground.
What gets created
When a database is added, you get:
- A configured database connected to your project
- Tables structured for your specific use case
- Security policies already set based on your app needs
The Data tab
Access your database by clicking the Data icon in the top bar (looks like a cylinder/database icon).
The Data tab has four sections:
| Section | What it shows |
|---|---|
| Database | Your tables with row counts and security policies |
| Users | User accounts and authentication |
The Database section is where you manage your tables and data.
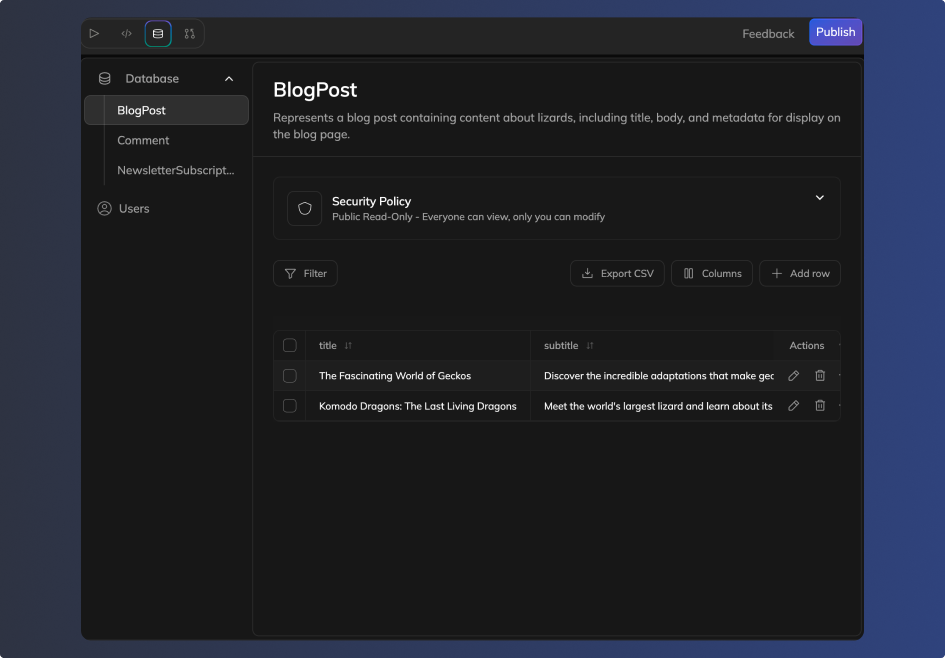
Understanding tables
Tables organize your data into rows (records) and columns (fields). Think of them like spreadsheets with structure.
Your tables
Tables are created based on your project. Building an e-commerce app? You might get Products and Orders tables. A contact form? A Submissions table. The AI structures tables to fit what you're building.
Each table shows:
- Row count — How many records exist
- Column count — How many fields per record
- Security policy badge — Who can access this data (more on this below)
Table details
Click any table to expand its detail view:
- Description — Explains what this table stores. Click to edit.
- Security policy — Shows current access rules with a visual indicator
- Data grid — Preview of your records with columns tailored to your table's purpose
Security policies
Security policies control who can create, view, edit, and delete records in each table. Understanding these helps you know how your data is protected.
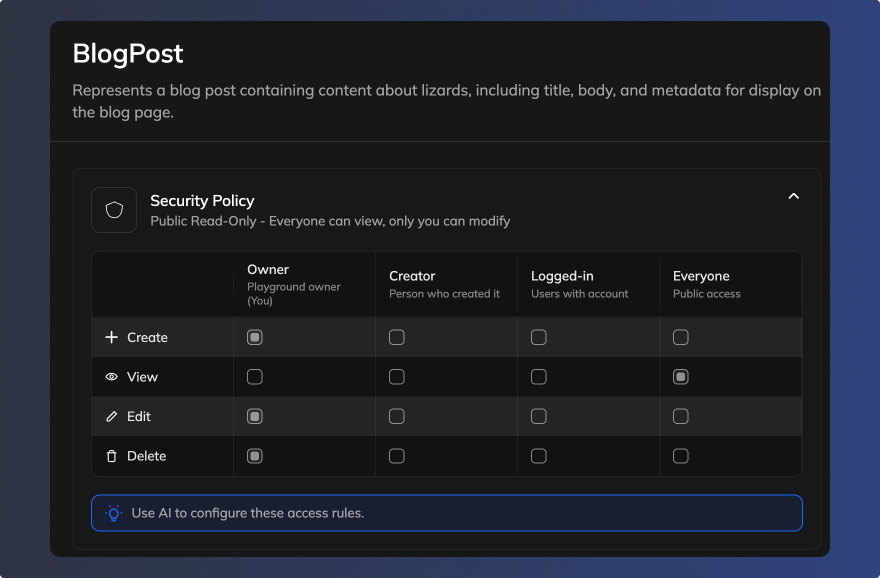
Access levels
Four access levels are available:
| Level | Who it includes | Used when... |
|---|---|---|
| Owner | Only you (the playground owner) | Sensitive data only you handle |
| Creator | The person who created that specific record | Users should manage their own submissions |
| Logged-in | Anyone with an account who's signed in | Features require authentication |
| Everyone | Anyone, including visitors without accounts | Public content or anonymous submissions |
Viewing permissions
The table detail view shows a permissions grid — a quick way to see who can do what with your data. This is read-only; to change permissions, just ask in chat (e.g., "let logged-in users create orders but only see their own").
Working with data
Viewing records
- Go to the Data tab
- Click the Database section
- Click any table to see its records
Records display in a grid with sortable columns. Each row shows an Actions menu for that record.
Customizing columns
Click Columns to show or hide specific columns in the grid. Useful for focusing on the data that matters most.
Adding records
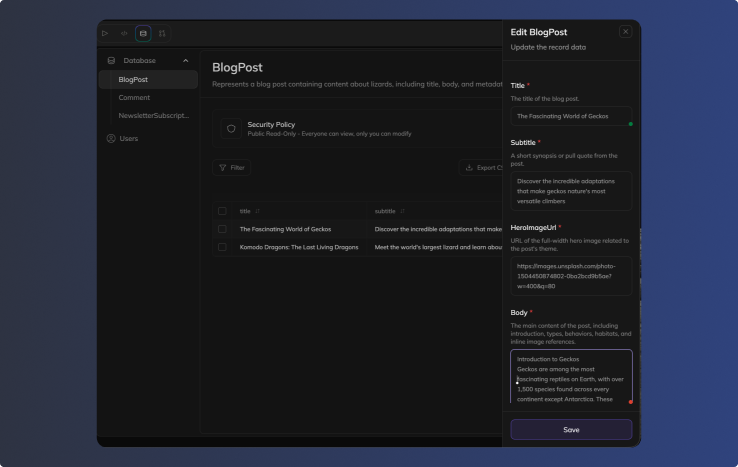
- Open a table's detail view
- Click + Add row in the toolbar
- A side panel slides in with form fields
- Fill in the required fields and click Save
Exporting data
Click Export CSV to download all records as a spreadsheet-compatible file. Useful for:
- Backups
- Analysis in Excel or Google Sheets
- Sharing data with team members
Importing data
Click Import CSV to add records from a file. The CSV columns should match your table's structure.
Deleting records
Two options:
- Single record — Click the trash icon in the Actions column
- Multiple records — Select rows using the checkboxes, then delete. Select all to delete everything.
⚠️ Heads up: Deleting is permanent. There's no undo, so export a backup first if you're unsure.
Tips and best practices
Managing through chat
The AI assistant handles most database tasks. Try asking:
- "Create a new table for blog posts"
- "Add a 'status' column to the Orders table"
- "Let users edit their own orders but not delete them"
- "Show me what's in the feedback table"
- "Change Products to public read access"
The assistant understands natural language, so describe what you need and it figures out the technical details.
Quick reference
| Task | How to do it |
|---|---|
| Open database | Click Data icon in top bar → Database section |
| View table records | Click table name in the list |
| Add a row | Table detail view → Add Row button |
| Export data | Table detail view → Export CSV |
| Import data | Table detail view → Import CSV |
| Change security | Ask the AI assistant in chat |
| Add a table | Ask the AI assistant in chat |
| Delete all data | Table detail view → Delete all records |
| Disable auto-database | Settings → Features → Toggle off Auto-add databases |
Skip databases by default
For users who'd rather not have databases added automatically, there's a global setting:
- Open Settings from the top bar
- Find the Features section
- Toggle off Auto-add databases
With this disabled, the AI won't add databases unless you explicitly ask for one in chat.
Updated 3 days ago