MUI (Material-UI) | Figma | VSCode
Transform any Figma design into clean, functional MUI code
TL;DR - Start a new MUI-based project, or generate code that integrates with your existing codebase
How it works
When you start using Anima’s Figma plugin MUI support, the process is as seamless as it is powerful. Anima detects design elements—even those not explicitly defined in Figma—and generates MUI code that aligns with your project’s needs:
- Generating New Assets? Start with MUI: Use the Anima plugin in Figma to create new MUI based components and screens.
- Integrating with an Existing Project? Go Further with Frontier: Frontier learns your existing code components, MUI theme provider, and other code conventions. It generates code that reuses these elements and suggests new code when necessary, ensuring seamless integration with your project.
Code examples
Anima automatically detects design elements—even if they aren’t defined as components in Figma—and generates MUI code that aligns perfectly with your project’s needs.
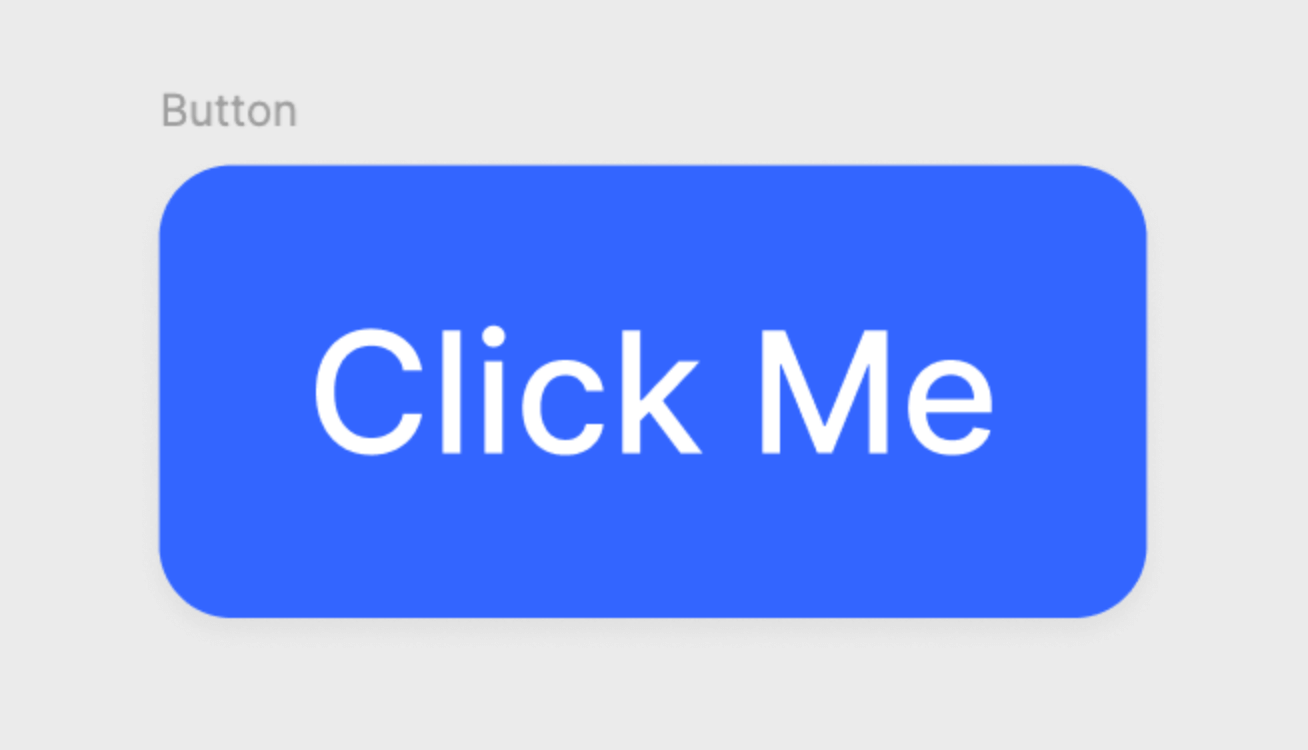
Simple Example: Button
Consider this basic button design in Figma that isn't defined as a component:
Here’s how generic tools might translate it:
import React from "react";
import "./style.css";

export const Button = () => {
  return (
    <div className="button">
      <div className="text-wrapper">Click Me</div>
    </div>
  );
};
Here’s how a Anima translates it into MUI code:
import React from "react";
import Button from "@mui/material/Button";

const CustomButton = () => {
  return (
    <Button
      variant="contained"
      color="primary"
      sx={{ height: "28px", borderRadius: "12px" }} // Adjusted for rounded corners
    >
      Click Me
    </Button>
  );
};

export default CustomButton;
In this example, Anima
- Recognizes the button as a potential component
- Generates the appropriate MUI component with the correct props
- Adds customization—like corner radius—that integrates seamlessly into your project.
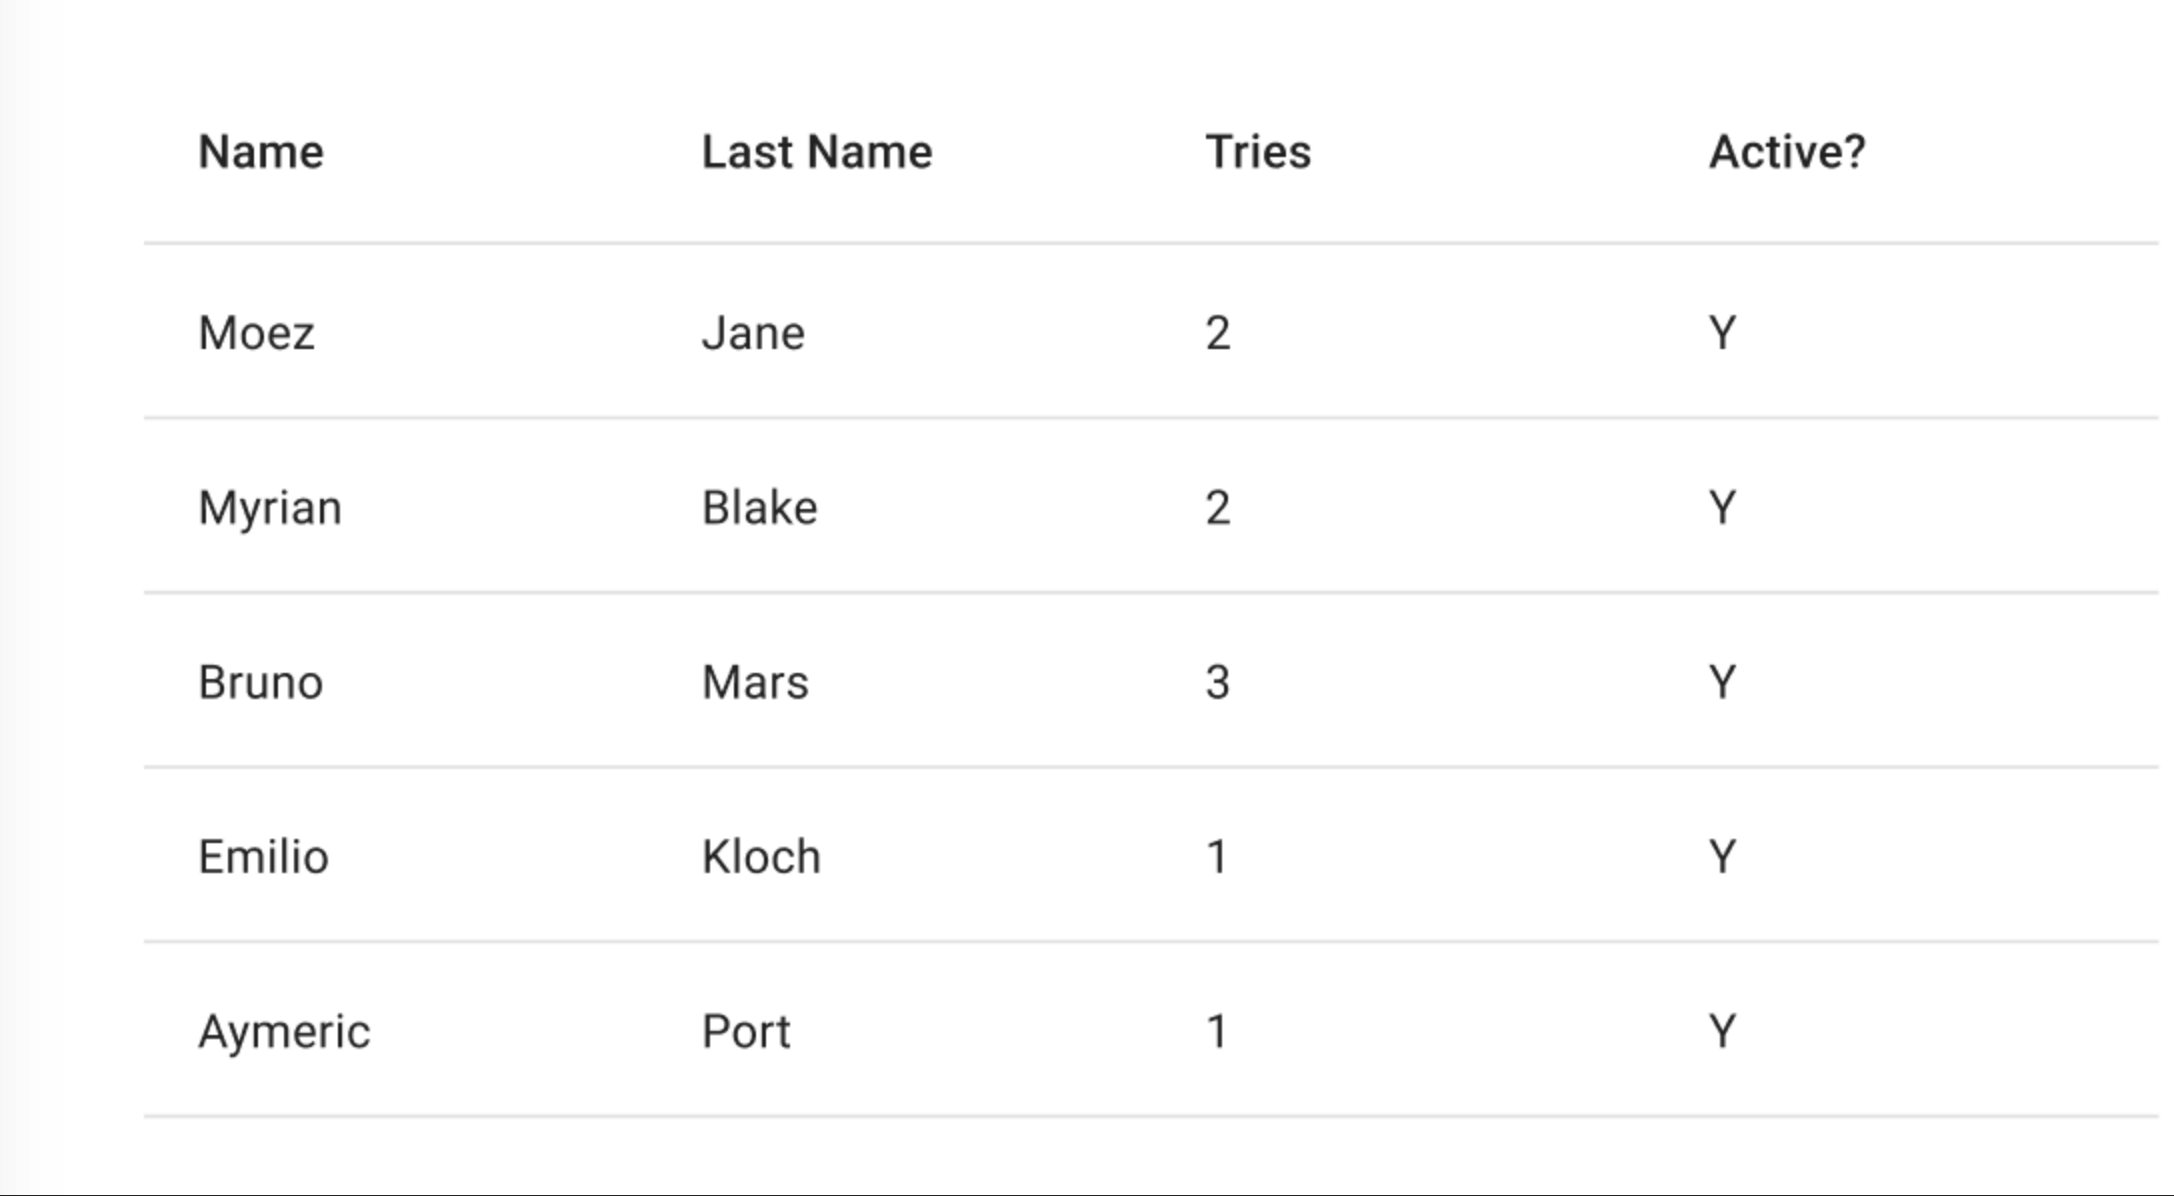
Advanced Example: Table
Now, let’s look at a more complex example—a table with multiple subcomponents. This is where Anima’s capabilities really shine, demonstrating its ability to handle advanced MUI components.
Here’s how a Anima translates it into MUI code:
import React from "react";
import { Table, TableBody, TableCell, TableContainer, TableHead, TableRow, Paper } from "@mui/material";

const DataTable = () => {
  return (
    <TableContainer component={Paper}>
      <Table>
        <TableHead>
          <TableRow>
            <TableCell>Name</TableCell>
            <TableCell>Last Name</TableCell>
            <TableCell>Tries</TableCell>
            <TableCell>Active?</TableCell>
          </TableRow>
        </TableHead>
        <TableBody>
          <TableRow>
            <TableCell>Moez</TableCell>
            <TableCell>Jane</TableCell>
            <TableCell>2</TableCell>
            <TableCell>Y</TableCell>
          </TableRow>
          <TableRow>
            <TableCell>Myrian</TableCell>
            <TableCell>Blake</TableCell>
            <TableCell>2</TableCell>
            <TableCell>Y</TableCell>
          </TableRow>
          <TableRow>
            <TableCell>Bruno</TableCell>
            <TableCell>Mars</TableCell>
            <TableCell>3</TableCell>
            <TableCell>Y</TableCell>
          </TableRow>
          <TableRow>
            <TableCell>Emilio</TableCell>
            <TableCell>Kloch</TableCell>
            <TableCell>1</TableCell>
            <TableCell>Y</TableCell>
          </TableRow>
          <TableRow>
            <TableCell>Aymeric</TableCell>
            <TableCell>Port</TableCell>
            <TableCell>1</TableCell>
            <TableCell>Y</TableCell>
          </TableRow>
        </TableBody>
      </Table>
    </TableContainer>
  );
};

export default DataTable;
This table example shows how Anima automatically handles the structure of a table from Figma, generating the necessary MUI components such as Table, TableHead, TableRow, and TableCell. Anima ensures that each component is used correctly, providing a clean and maintainable codebase.
Best practices
While Anima works well with any Figma design, it performs best when using the official MUI Figma library. Aligning design elements closely with MUI components will result in the highest quality code generation, minimizing manual adjustments and streamlining your workflow.
Get started
With Anima’s powerful MUI integration, you can convert any Figma design into high-quality, functional code, no matter how it’s structured. Say goodbye to manual coding and start saving time today. Explore how Anima can transform your development process by trying it with your next project.
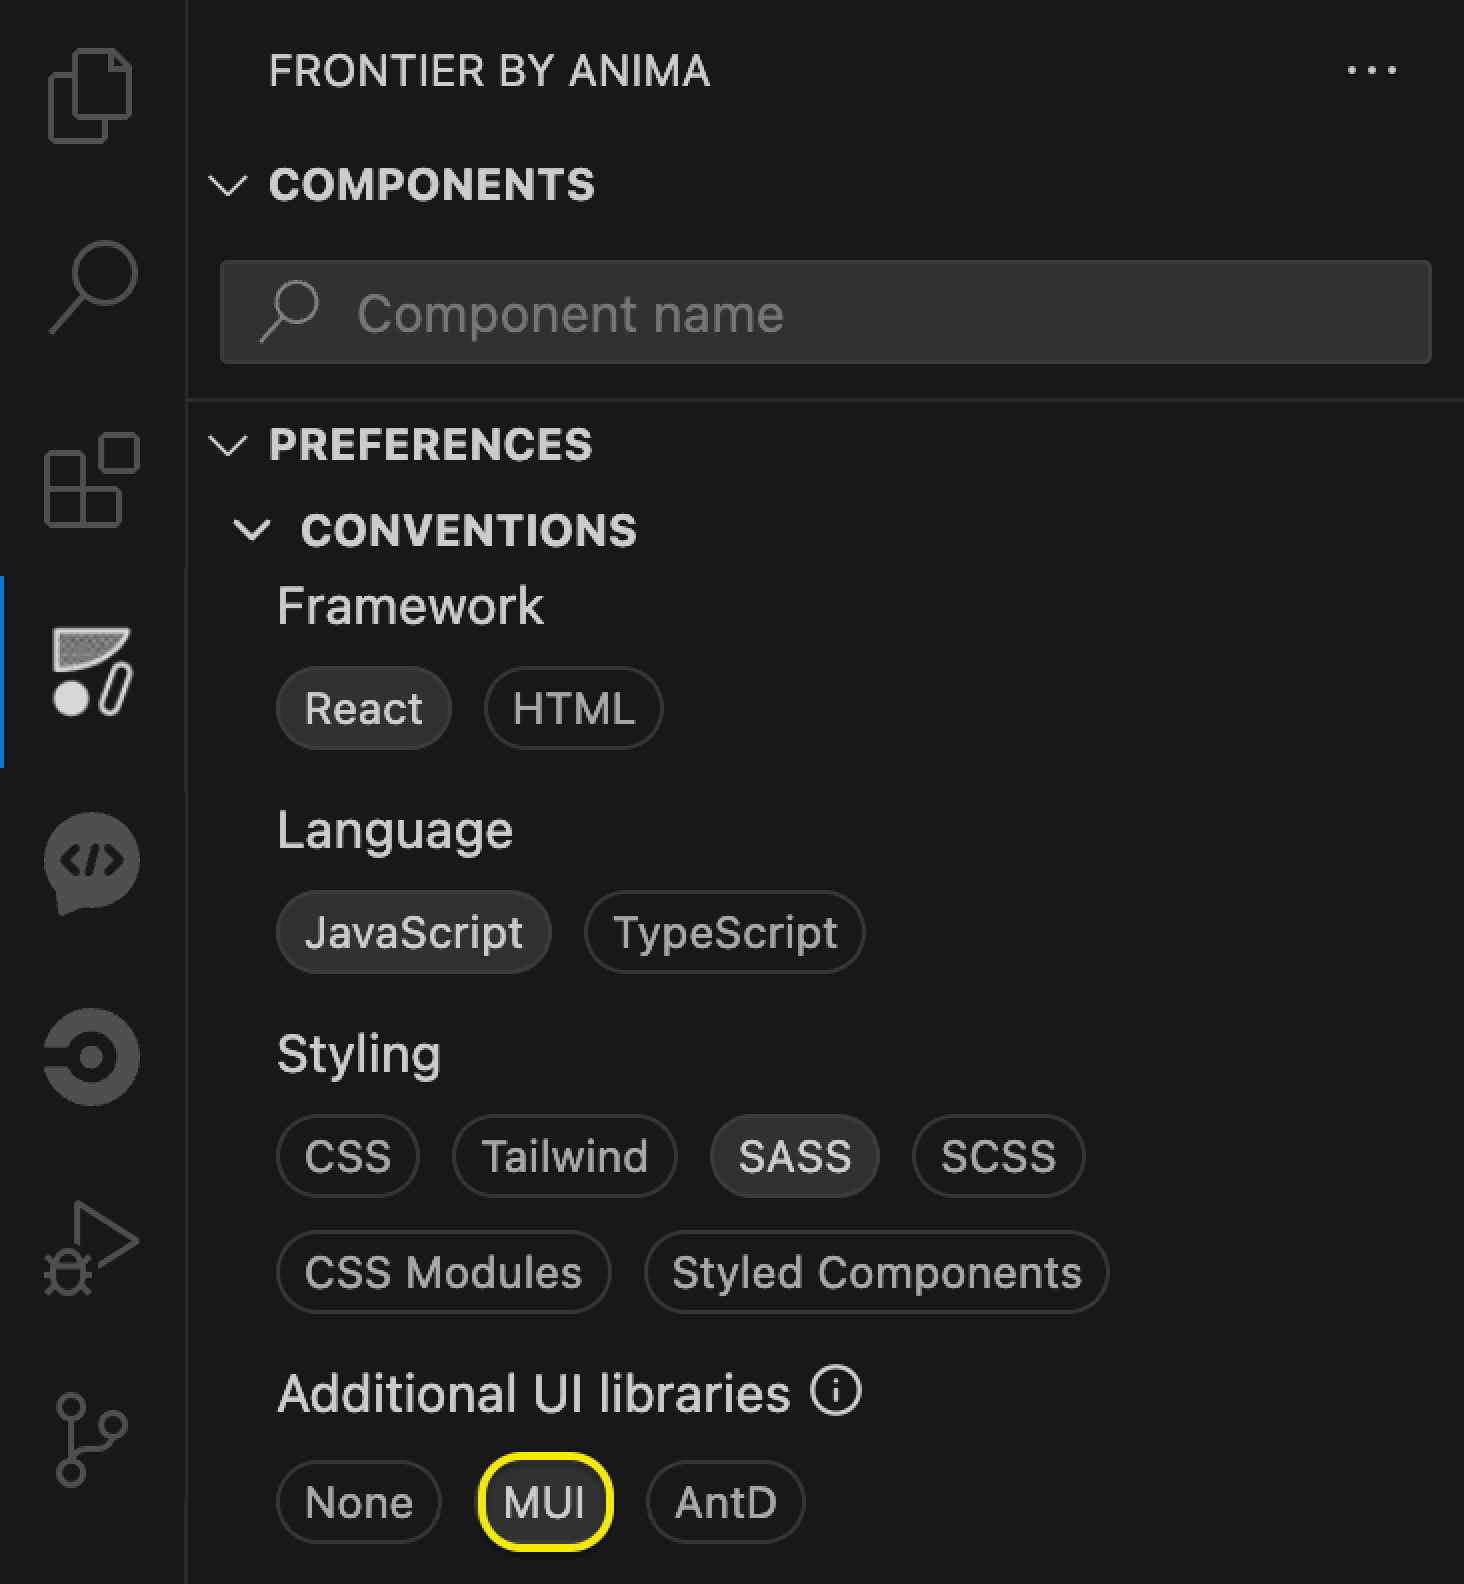
Anima plugin
Just open the code settings dropdown and select "MUI"
Frontier
-
Frontier will automatically detect all MUI components used in your project.
-
If you would like to enrich the code generation with MUI components you haven't used in your project yet, select "MUI" under your code preferences:
- Open Preferences > Conventions > Additional UI libraries > MUI
Updated over 1 year ago